


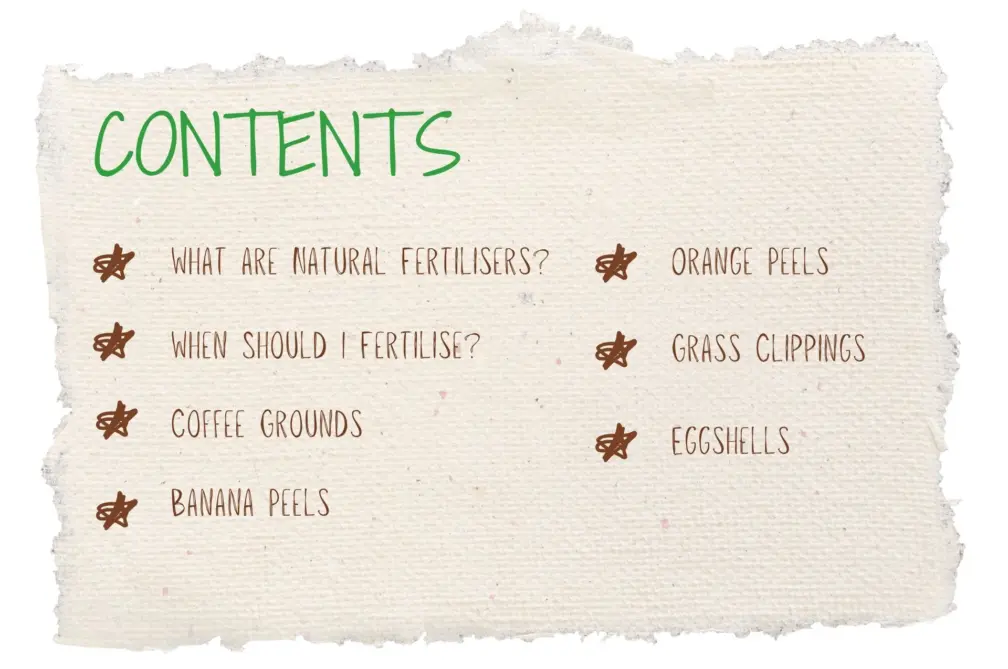
Top 5 Natural Garden Fertilisers
Want to give your lawn a nutrient boost? For the most effective and fast acting results, we’d recommend using a high-quality chemical lawn feed.
Chemical fertilisers will have specific makeups of NPK (Nitrogen, Phosphorous, Potassium) that are designed to give your lawn a seasonal boost. In Summer, you’ll want a feed that’s high in Nitrogen to help keep your lawn nice and green. Whereas in Winter, a lower nitrogen and higher potassium ratio can help keep your root systems strong and stable in the harsher weather conditions.
While a high-quality chemical fertiliser will provide you with a fast-acting nutrient boost, many gardeners are turning towards natural, household items to give their garden a second-hand nutrient boost.
What are natural fertilisers?
Natural fertilisers are fertilisers that are plant-based and have no added manufactured chemicals. They are used from household waste items, like food scraps or grass clippings and can provide your garden with small boosts of Nitrogen, Potassium, Phosphorous or Calcium.
Natural garden fertilisers work slowly, giving you uniform plant growth over a long period of time. There are several DIY home-made organic fertilisers that can be made from household items, which are an easy and cheap alternative to chemical fertilisers.
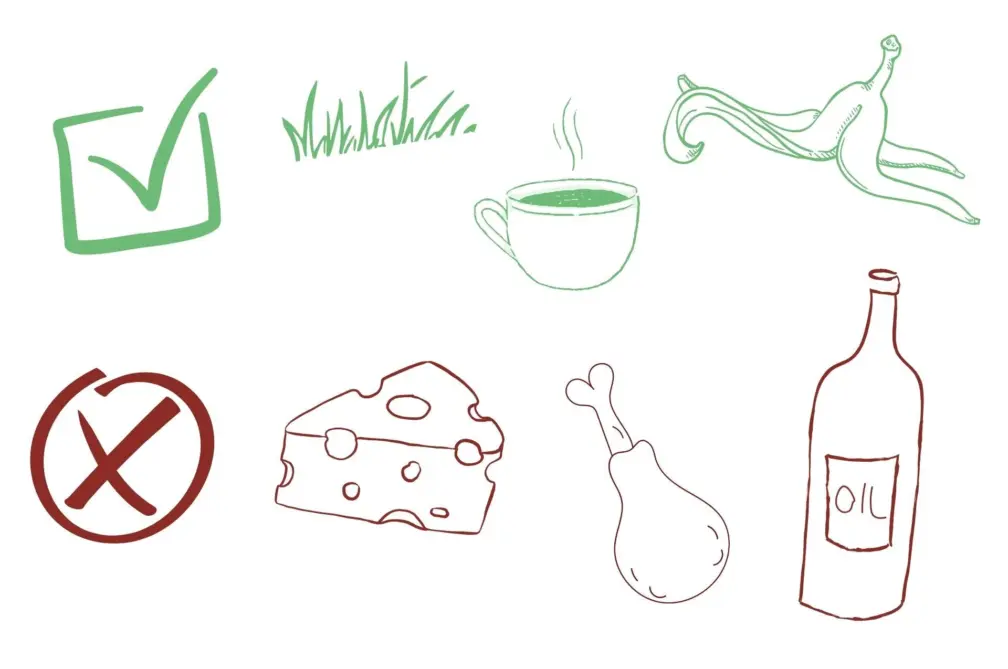
A general rule to follow is that any oily, dairy-based or meaty, fatty products should be avoided and not used in the garden. They don’t degrade easily, have little to no nutrient effect on your soil, and can smell strongly, which attracts pests.
Alternatively, anything you’d add into a compost pile that can naturally biodegrade into the soil can usually help provide a nutrient boost to your garden like coffee grounds, grass clippings, or banana peels.
When do I fertilise?
You should fertilise your garden seasonally and sparingly to make sure your soil pH is staying balanced and neutral for optimal, healthy plant growth.
Compostable raw materials can be used to help provide a nutrient boost to your soil. They’re best used to help strengthen your plant - whether that’s through increasing their growth rate, helping them recover from any damage, or simply to help see them through the change in seasons.
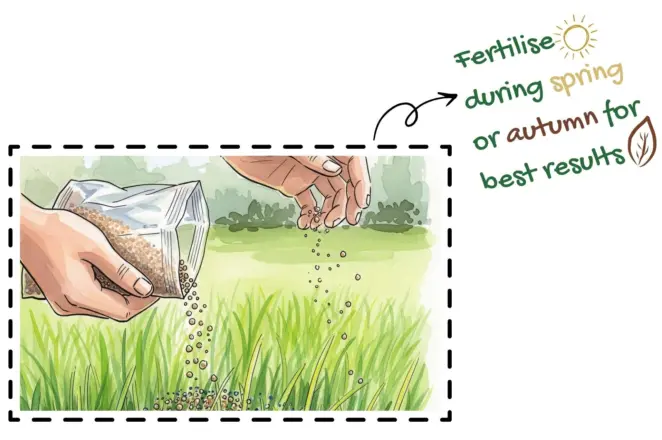
The best time to apply fertiliser is during Spring and early Autumn to make sure your soil is rich in nutrients for the season ahead.
Fertiliser can help provide a growth boost ready for the warmer temperatures of Spring / Summer or help strengthen your plants ready for their dormancy period over winter.
Fertiliser can help your garden thrive but adding too much can harm rather than help your plants.
Some of the signs that you may have been adding too much fertiliser to your plants include stunted growth, burned and wilting leaves, or the plant may even die completely.
:: Coffee Grounds
You can use leftover coffee grounds as a top dressing or lawn fertiliser – it’s a DIY, eco-friendly alternative to chemical fertiliser.
Coffee grounds are rich in nitrogen, potassium and phosphorus which help green up your lawn and improve poor ground conditions that are causing your lawn to look patchy and thin. Nitrogen also helps aid healthy plant growth, making them nice and green with stable root systems.
Coffee tends to be slightly acidic, so works best on plants that love a slightly more acidic soil like hydrangeas. They also help re-balance a slightly alkaline soil pH back to neutral. A Neutral pH of 7 is ideal for the healthy growth of most plants. However, the caffeine in the coffee grounds can be known to restrict the growth certain plants like tomatoes and geraniums and shouldn’t be used on any sensitive, early growth plants or seedlings.
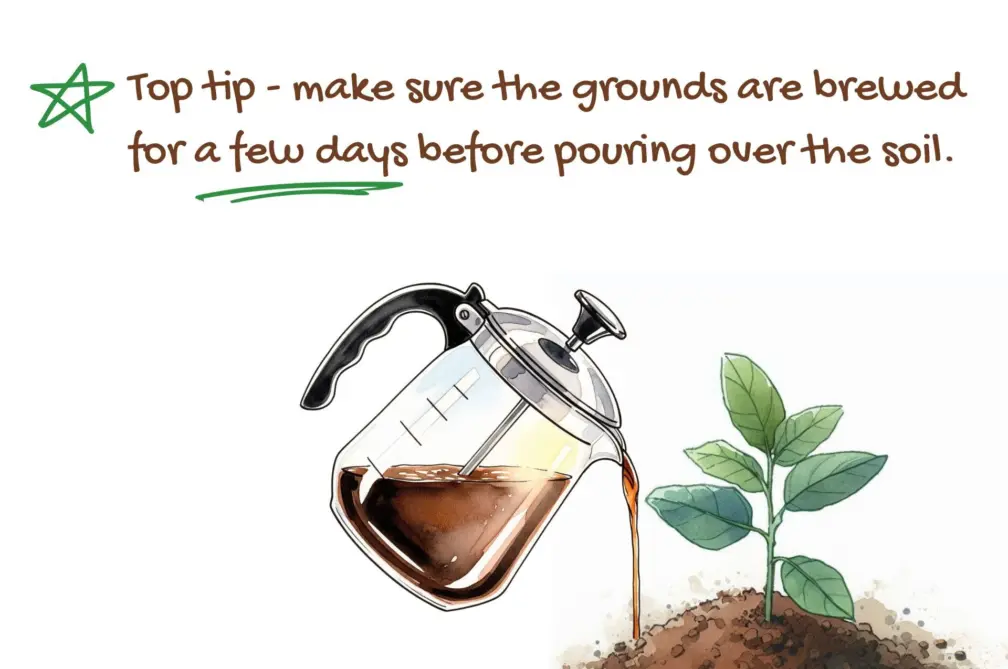
There are several ways to use coffee grounds to fertilise your garden, but make sure that you’re using grounds that have already been used.
Once the grounds have been initially filtered through water, the caffeine content in them significantly decreases, as most of it will have gone into your coffee! Too much caffeine can cause stunted growth in plants, so it’s best to use filtered, used grounds so that you’re only getting the good stuff, like nitrogen and potassium.
- If you’re using grounds from home, you can save them in a jar, let them cool and then mix them into some topsoil to make a topdressing mixture.
- You can then sprinkle this mixture over your lawn, flower beds or soil to allow the nutrients to be absorbed by the ground.
- If you don’t fancy drinking lots of cups of coffee (or prefer a cup of tea) then local coffee shops often give away leftover coffee grounds to save them from landfill, so you can go in and ask for some for free.
You can add coffee grounds to your compost pile as part of your ‘green’ waste.
This usually includes soft, plant-based materials like grass clippings, leaves, and food scraps.
Brown waste, on the other hand, includes carbohydrate-based dried waste, like wood shavings, paper or cardboard.
Coffee grounds will add a boost of nitrogen to the pile, which also helps increase both the microbial activity and the temperature inside the pile.
A warm, well-balanced pile is more efficient and breaks down waste faster. Once it’s been fully composted, you can then use it to fertilise your garden.
An optimal compost balance should be 25%-40% green waste, and 60%-75% brown waste to allow the microorganisms to effectively break it down.
If you’re wanting a more fast acting solution and can’t wait for your compost pile to decompose, then applying the grounds to your garden directly can also help give your plants and lawn a boost.
You should sprinkle them around the base of your plants so that they target the roots directly. You can even bury them a few inches deep under the soil for an even more targeted boost. If sprinkling them over your lawn, you should water the lawn afterwards to help the soil absorb the grounds.
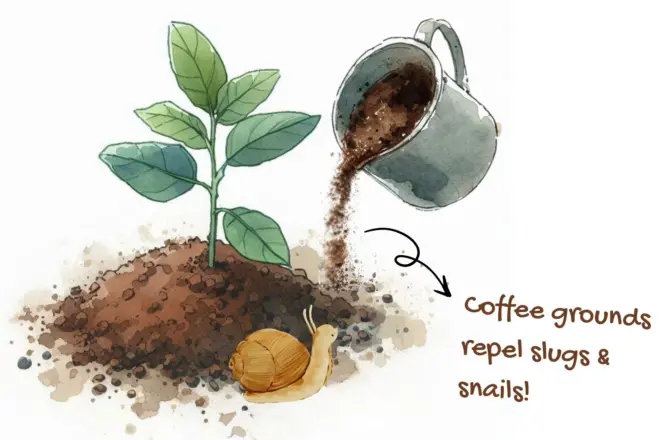
Coffee grounds can also help repel slugs and snails because of their gritty texture, strong smell, and the caffeine that they contain.
Their texture makes it difficult for slugs to crawl on and the smell is off-putting, encouraging them to avoid the area where the grounds are spread.
Caffeine is also known to be toxic to slugs and can even cause death if ingested.
Spread the grounds around the base of plants you don’t want slugs or snails accessing and it should help deter them.
:: Banana Peels
You may think that banana peels are simply food waste, but they can actually be an effective garden fertiliser that helps gives your plants and lawn a potassium boost.
Banana peels contain a high amount of potassium alongside a mixture of magnesium, phosphorus, iron, and calcium. They’re a cheap and natural way to give your soil a mixture of nutrients.
Their potassium levels make them particularly effective for plants who need a high amount of potassium to thrive, like tomatoes, roses or dahlias.
Potassium can help plants develop strong root systems, making them hardier to drought conditions and resistant to disease.
You’ll be able to tell if your plant is deficient in potassium if you’re seeing the tips of the leaves start to brown, or, if you notice your lawn wilting and its growth slowing, this is a sign it could do with some potassium.
However, these signs can be due to a number of issues, so it’s best to test your soil to see which nutrients it’s deficient in before fertilising.

Banana peels also don’t contain any nitrogen, which is particularly important for healthy plant appearance and root growth- it essentially makes sure your plants are nice and green and stable! So, you may need to add different food materials that are high in nitrogen (like coffee grounds!) to make sure the soil is getting a balanced boost.
You can put banana peels on top of your plants or soil and, over time, they will eventually biodegrade down and provide a nutrient boost to the soil. However, as you’re waiting for the peels to degrade, the smell may begin to attract pests, so burying them in the soil is usually the preferred option.
Burying banana peels is a great way to enrich your soil as it acts in a similar way as if you were using them in a standard compost pile, but, because you’re applying them direct to source, they can provide a more targeted nutrient boost to your plant roots where they need it the most.
Burying your banana peels at the base of the plants is usually the preferred spot as it’s close to the roots for quick absorption. You should also make sure you’re that you’re burying them at least 10 cm deep so that there’s enough heat / insulation for the microorganisms in the soil to break down the peels, just like in a compost pile. The deeper they’re buried, the more protection from adverse weather conditions and the less likely they are to attract pests, too.
Remember to be patient, as it can take a while (like it would with any standard compost mix) for the peels to degrade into the soil and have a visual boosting effect on your plants.
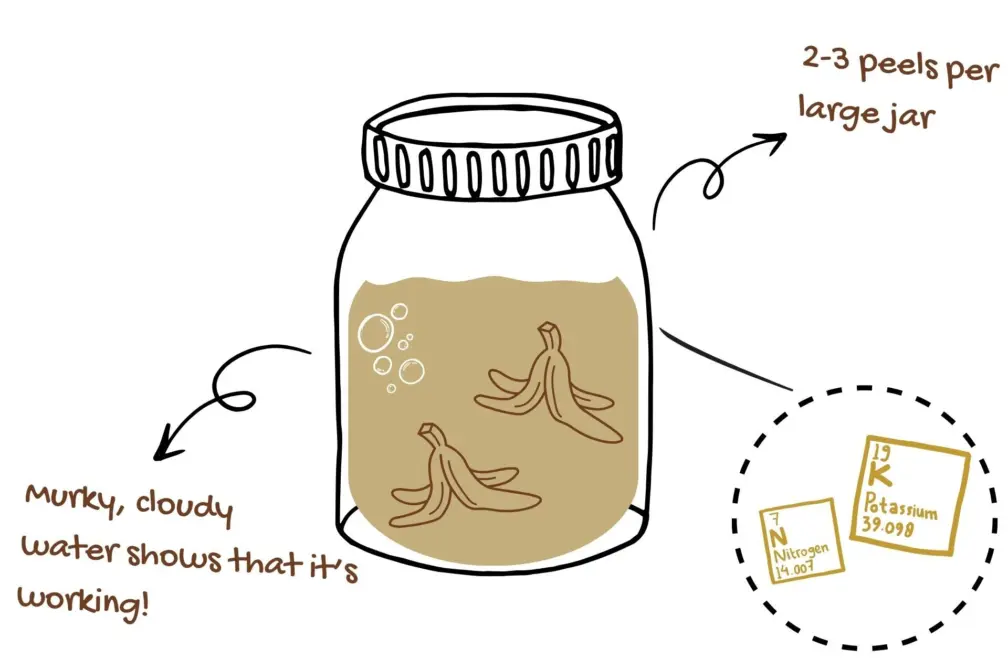
How to Make Banana Peel Water:
- Start by collecting your peels in a jar.
- Once it’s full, fill it with room-temperature water.
- Let the mixture ferment in a cool, dark place to allow the bacteria enough time to break down the peels and release the nutrients into the water.
- After a few days, the water should be a brownish colour. You should strain it to remove the peels and just keep the leftover water.
- You need to dilute this mixture with more water, to make sure that it’s not too strong for your plants. Aim for a 5 parts water to 1 part banana peel water ratio for the best results.
- If you’re planning to use on more sensitive plants, you can even dilute the mixture even further with a 10:1 ratio.
- The banana water can then be poured straight onto the soil at the base of your plants.
Don't over-fertilise your plants with banana peels, as it can affect the soil pH balance and stunt the growth of your plants.
Too much potassium may stop the plant from absorbing other essential nutrients like magnesium and calcium, so fertilising with banana peels should ideally only be done when your soil needs a targeted potassium nutrient boost.
Fertilising is best done seasonally, so either in Autumn before Winter to help see the ground through winter, or in early Spring to bring it out of winter dormancy and refresh before the growing season.
For a quicker way to use your discarded peels without waiting for them to degrade, you can brew them into a nutrient-packed water. This liquid fertilizer is packed with potassium and other essential nutrients that can offer a fast and effective boost to your garden.
:: Citrus Peels
Citrus scraps like orange or lemon peels can be used as part of your ‘green waste’ in your compost pile to help fertilise your garden, or (like banana peels) they can be buried at the base of your plants to target the plant roots directly.
Citrus peels contain nitrogen and phosphorus for healthy leaf and stem growth, alongside strong root development.

Like banana peels, make sure you’re burying the scraps at least 10 cm deep so that there’s enough heat / insulation for the microorganisms in the soil to break down the waste.
The best way to apply the peels would be to chop them up into smaller pieces – this way, the surface area is larger and you can apply a boost to a larger area more easily, which is especially important in flowerbeds etc.
The smaller the pieces, the faster they decompose into the soil, too.
Citrus peels are highly acidic – they are generally used to increase the pH of your soil, or to balance out highly alkaline soil.
This is effective for plants that thrive in highly acidic soil, like hydrangeas, azaleas, potatoes or tomatoes.
You may also want to use them for your lawn if you have a soil pH of above 7, which is alkaline.
A highly alkaline soil can potentially stop absorbing nutrients, which is called ‘Nutrient Lockup’.
By applying acidic citrus peels to your lawn, you can help restore the balance - a pH of 7 is ideal for general plant growth.
When your plants are experiencing nutrient lockout – they’re unable to intake the nutrients that you are feeding them. It truly is like the nutrients are “locked” out from getting inside your plants!
As with adding any form of nutrients to your garden, adding too much in one go can affect the pH balance of the soil.
You may start out trying to fix highly alkaline soil and end up with soil that’s too acidic instead! So, only use it sparingly when the soil needs an acidic nutrient boost.
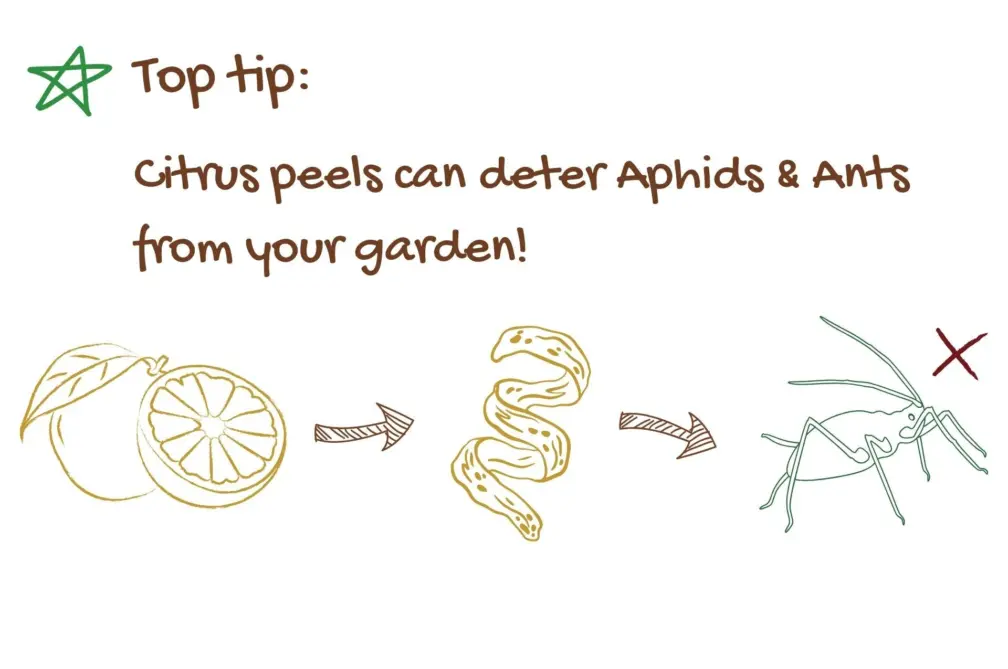
As well as providing an acidic boost to your soil, citrus peels also have other beneficial effects to your garden.
The strong, citrus smell can deter certain pests like ants or aphids who will stay away from any plants you place the peels near.
Instead of burying them, try placing the peels on top of the soil near to any plants you want to protect. The strong, citrus smell will deter pests like ants or aphids from the plants. As the peels degrade into the soil over time, you can replace them with fresh peels to keep the smell strong for the most effective results.
:: Grass Clippings
Constantly clearing grass clippings off your lawn after mowing can be a pretty relentless task, so why not try leaving them on your lawn instead?
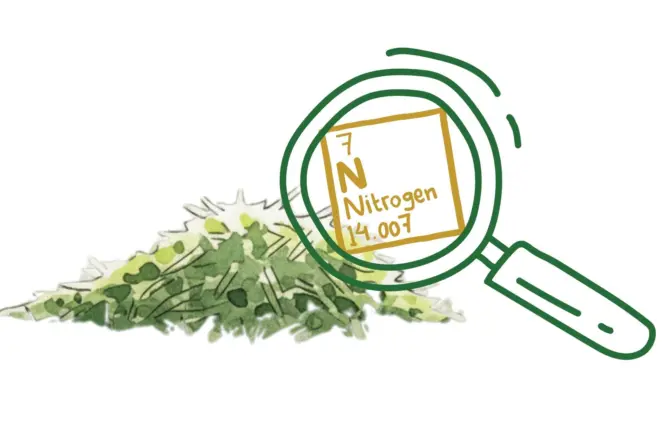
A light layer of grass clippings can help provide a nitrogen boost to your lawn, but you have to make sure you’re using them in the right way, otherwise you can risk damaging your lawn instead of helping it.
Grass clippings are rich in nitrogen, which helps improve the growth of your grass, giving you a dense and lush lawn. It also helps enhance the blade’s green colour.
You may be able to tell if your grass needs a nitrogen boost just by looking at your lawn – a lack of nitrogen will often show as thin or patchy growth, or by the blades turning yellow or pale green.
However, these are common lawn care issues so may not be directly related to a nitrogen deficiency. It’s always best to test your soil to see what nutrients it may need before leaving clippings on your lawn.
As well as high levels of nitrogen, grass clippings also contain essential nutrients that plants need like potassium and phosphorus.
As they slowly decompose, they provide a slow and balanced release of these nutrients to your lawn, which is a great option if you want a sustained boost to your lawn, rather than a burst of fertiliser in targeted areas.
By mowing your lawn regularly, you’ll be producing shorter clippings which are ideal for leaving on the lawn.
If you let your lawn grow significantly and take a lot of length off in one mow, the clippings may be too long and dense. This can then actually block airflow from reaching the lawn, which is crucial for healthy grass growth.
Mowing twice a week during summer when your grass is actively growing and leaving the clippings on until the next mow is an effective way to give the lawn a boost.
Make sure you’re only mowing the lawn when its dry, as leaving wet grass clippings on your lawn can reduce airflow and crate the perfect, humid conditions for fungal lawn diseases to thrive in.
Wet clippings can also risk clogging your mower deck and blades, so its best for both your grass and mower health to only mow the lawn when its dry.
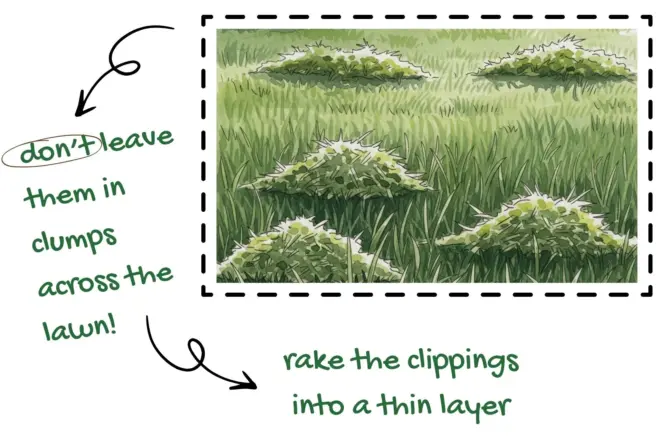
- You want a light, even coverage of clippings to make sure you’re not encouraging humid conditions.
- You may even want to lightly rake them to allow them to be distributed evenly across the lawn, rather than in dense, isolated clumps.
- You may want to make sure your lawn is weed-free before mowing, otherwise the clippings may carry and spread weed seeds over to other areas of your garden.
If you want to save your clippings rather than letting them degrade back into the lawn, you can collect them and add them to your compost pile as part of your green waste.
Using your grass clippings to help top up your pile helps provide a nitrogen boost to your compost, which helps speed up the decomposition process.
You can then use this compost to fertilise the lawn, or other plants in your garden.
It’s important to note that, if you have previously used any chemicals on your lawn like pesticides or herbicides, the clippings may not be suitable for other organic uses, like putting in a compost pile.
The clippings will carry the remnants of the chemical over to the compost pile and potentially ‘infect’ the pile with the chemicals, defeating the point of having this eco-friendly, homemade natural compost.
:: Eggshells
Eggshells are a great natural fertiliser to use in your garden as they’re packed with calcium.
Calcium is important for healthy plant cell growth, aiding in photosynthesis. They can help improve the resilience of plants like tomatoes and peppers – if you’re seeing red or brown edges on new leaves that are growing, this is a sign it may need a calcium boost.
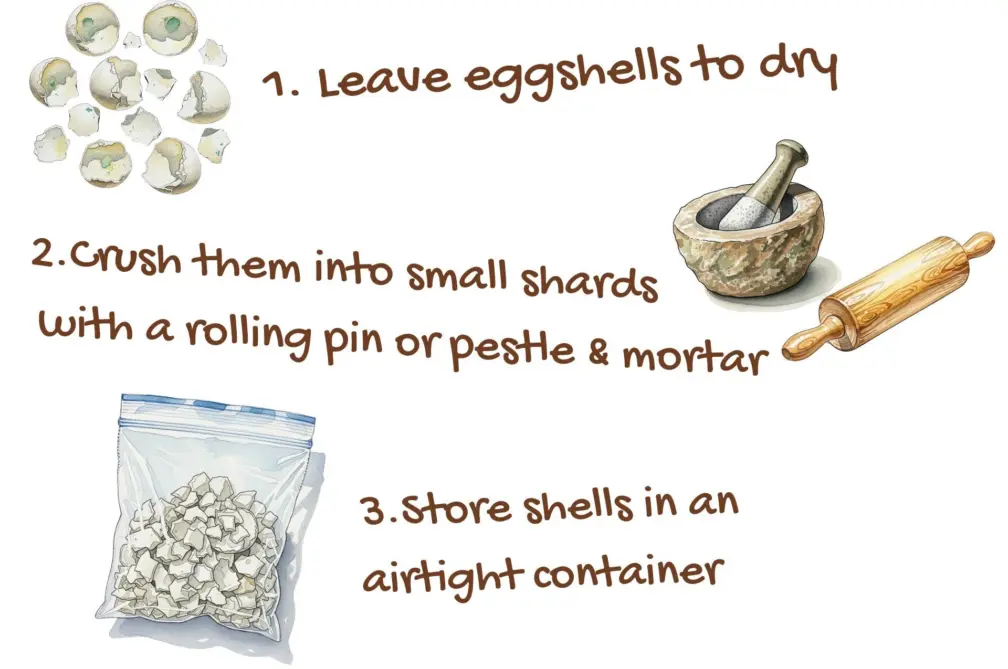
You should always clean and dry the egg shells before using them in your garden, so that there’s no egg residue left behind. The shell is where the calcium is, and any unwanted egg residue may smell bad and attract pests.
You should collect any discarded shells and store them in an airtight, dry container until you have quite a few. Once you’ve collected a number of shells, they’ll need breaking down into smaller shards.
This can be safely done either with a mortar and pestle or a ziploc bag and a rolling pin. The small shards are quicker to decompose into the soil and can be spread across the soil more easily.
Once you have the shards, you should sprinkle them around the base of your plants, add them to your compost pile or bury them underneath the soil of plants you want to target with a calcium boost.
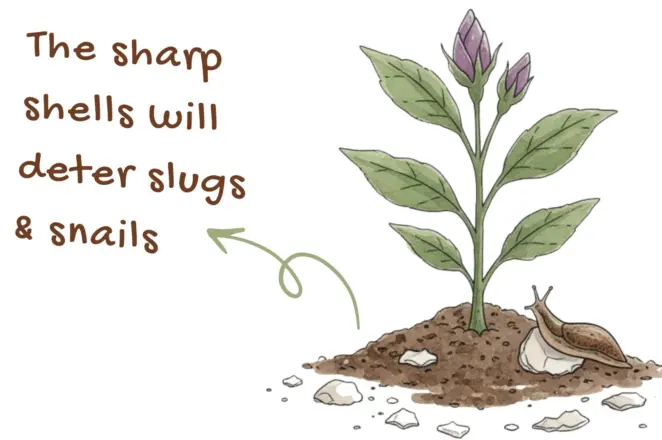
Eggshell scraps are also well-known for deterring slugs and snails from eating your plants.
So, as well as providing a natural calcium boost, the sharp texture of the crushed shards will prevent any slugs or snails them from accessing your plants via the stem.
You can also use the shells in their original form to make an ‘eggshell tea’ – where you boil the shells, let the water cool and then marinate for a few days to make a calcium rich fertiliser water.
Boiling the shells helps quickly release the calcium into the water, but it’s important to then let the shells marinate for a few days to get the most effective, calcium-rich solution. So, you may not see too much of a boost if you’re simply using your leftover boiled egg water from breakfast!
Once you’ve let your eggshell ‘tea’ marinate, the water is perfect to use on calcium-loving plants like roses, peppers, or tomatoes.
There are so many ways that you can use natural, at-home products to help give your garden a boost. These DIY solutions not only enrich your soil and help your plants thrive, but they also reduce waste and save you money. By using what you already have, you’re nurturing both your garden and the planet.
While these DIY fertilisers are a great start, the healthiest gardens start with high quality materials. Explore our premium turf products - available for next day delivery.
Or, check out our expansive knowledge base for more eco friendly gardening tips.
