


How to Make a Living Roof
What is a Living Roof?
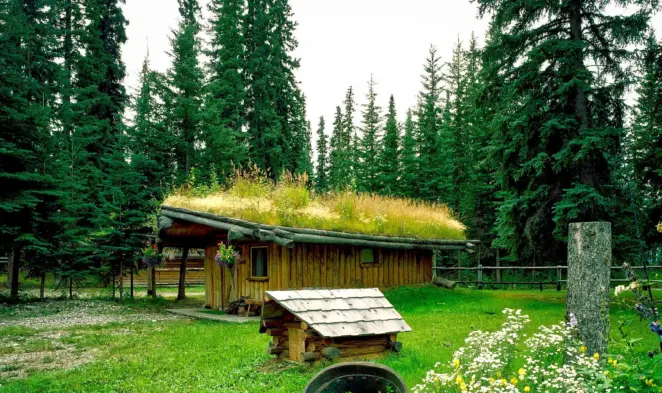
A living roof, or a ‘green roof’, is a layer of either turf or plants grown on top of a structure, like a house, shed or garage. Not only do they look impressive, but they’re also great for improving insulation to your structure and provides an area that local wildlife or beneficial pollinators can access.
Can I Build a Living Roof?
The thought of tackling a large project like building a living roof can be daunting (especially for those who are scared of heights!) but, whilst the job looks highly specialised, it’s actually easier than you think.
As long as you approach it with the right preparation and a devised plan, even a novice can manage to create a living roof as a manageable, DIY project.
The process of creating a living roof is completely different to any gardening project you may have undertaken before – it’s fundamentally different from laying turf on the ground, or sowing seeds in your garden. Creating a living roof requires you to consider drainage, weight and, of course, safety precautions when working at a height.
Our DIY guide takes you through each stage to make sure you’re prepared for the project fully. Before you start the project, it’s crucial to make sure your ladders and safety equipment are in good condition and are fully secured for an easy and safe build.
Why Choose a Living Roof?
The benefits of a living roof are endless – not only do they look visually appealing, but they provide a number of both practical and eco-friendly advantages.
The aesthetic appeal of a living roof is usually the main driving point for having one – it can soften the look of a building and give it a rustic, natural feel. It can also help your structure feel integrated into the natural landscape, alongside providing a natural habitat that can support local wildlife, like bees, butterflies and other beneficial pollinators.

As well as being a visual novelty, the layer of turf or flowers offers increased protection for the roof by shielding the membrane beneath from the elements as well as wear and tear.
This offers improved longevity for the building and, if there are any minor damages, natural products are resilient and self-repairing for any minor damages.
A green roof is also a great natural insulator, helping to keep your building noticeably warmer in the colder months by trapping heat between the layers of roof, membrane and turf.
It can also keep you cooler during summer by absorbing a lot of the heat, so it doesn’t transfer into your building. This helps conserve energy, which is great for both the environment and your energy bill!
If, during winter, you experience heavy rain, the natural turf layer also helps with drainage, as it can retain a significant amount of rainwater and moisture, meaning your gutters won’t need to be used as much! It can also dampen the sound of heavy rainfall, making it noticeably quieter.
How to Build a Living Roof
Before even beginning to construct the roof, you need to make sure your plan is thorough – preparing is the best way to make sure the project is easy as possible (especially for beginners) and, most importantly, safe.
Before creating a living roof, you should check that the roof you want to install your turf on is structurally sound enough to take the weight of your living roof. You should hire a professional to do this if you can, for the most trustworthy results.
As you’re dealing with natural products, the weight can vary depending on the weather conditions, so you need to calculate the heaviest your roof could possibly weigh to make sure it’s stable and can safely bear the weight.
Turf can be surprisingly heavy, particularly when wet, as it will retain lots of the moisture from rainfall.
Wet turf can weigh up to 23-25kg per square metre, so you’d need to calculate the maximum weight of the turf, alongside the weight of your timber frame, and waterproof membrane etc to make sure the roof can take the full load.
Your personal safety is also important to consider when building a living roof, as you’ll be working from a height.
You should make sure your ladder is in good condition and is stabilised, so that you can carry heavy items up to the roof with no danger of falling off or dropping the items onto something (or someone!) below.
If you can, getting a second person to help will increase your safety – you can then have one person on the ground to pass up any heavy materials and stabilise the ladder, and one person on the ladder receiving them and transferring them onto the roof.
You will need:
Tools:
- Tape Measure
- Saw
- Rake
- Ladders
- Drill
- Staple Gun
- Garden Hose / Watering can
Materials:
- Timber
- Topsoil
- Pond liner / waterproof plastic sheet
- Root membrane
- Your choice of turf or wildflowers
:: Constructing the Frame & Waterproofing
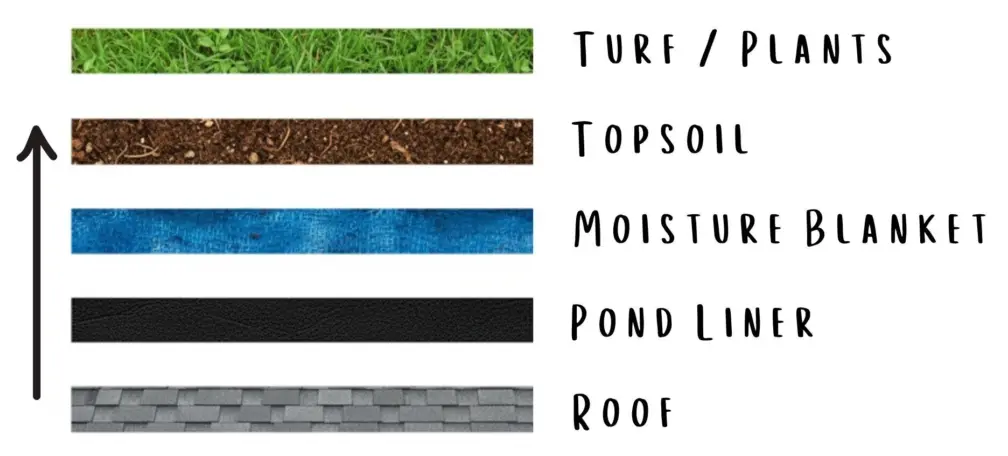
The first step to making a living roof is prepping the roof correctly - creating a timber frame around your roof will allow you to attach a waterproof plastic sheet / pond liner along the bottom, which will help protect the building interior from any leaks. This frame will also help contain the entire living roof and ensure that any soil or turf doesn’t simply fall off and keeps growth to within the frame.
You will also need to install a root membrane to stop the roots penetrating too deeply into the roof structure. This protective barrier, also known as a moisture blanket, helps maintain the integrity of your roof by stopping the turf roots from causing damage or compromising the waterproofing layer beneath.
Root membranes are widely available from most garden centres and are commonly used in landscaping projects such as garden borders, beneath decking, or in planters to stop weeds from growing through.
You should arrange the different material layers with the roof layer at the bottom, then the frame, add the pond liner and root membrane, followed by the topsoil and, finally, the turf or plants.
Constructing the Frame:
- Begin by measuring up the outside of your roof, measure twice for accuracy and cut the timber to size. If you are building a living roof on a wooden shed, you can fix the frame to the roof with some decking screws.
- You should also make some small drainage holes in the frame to allow for any moisture to drain away successfully. If there’s heavy rain, this means the water will drain off the roof, rather than downwards and into the structure!
- Drill several 10mm holes spaced about 15cm apart to allow excess water to drain out into your gutter or onto the ground. If it’s a slanted roof, you should place the holes at the bottom of the lower end and, if it’s a flat roof, drill the holes on the sides of the frame.
- Unroll your pond liner and cut to size, you will need to cut a slightly bigger area so it can be secured up and over the timber frame. Take care with this step and ensure that you don’t accidently rip or tear any holes in the middle of the pond liner, otherwise water can soak through onto the roof. Lay it flat and push it into the corners of the frame and secure it on the outside edge of the frame with the staple gun. You can then cut small slits into the pond liner to match the drainage holes you made to allow any water to flow out.
- You should then lay the root membrane directly on top of the pond liner, which will help the roots stop growing downwards into the pond line, which could potentially damage it. Secure this to the frame in the same way as the pond liner.
:: Preparing the Soil Base
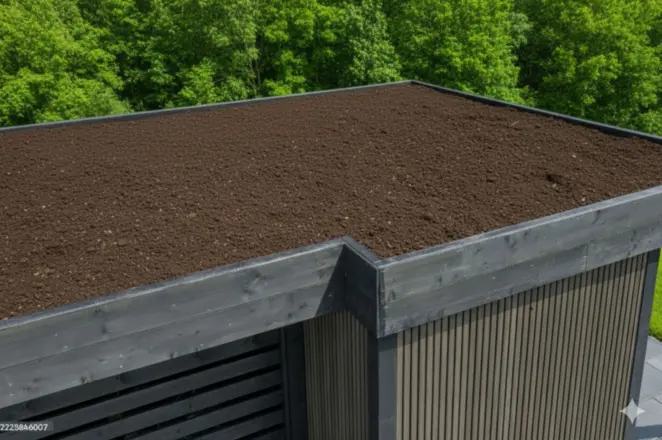
Now the frame and roof are both waterproof and protected from excessive root growth, you can then add soil to the finished frame.
The soil you’re using should be good quality, light and crumbly. You don’t want to use dense, compacted soil as this can add unnecessary weight to the structure.
You should make sure you’re transporting the soil up to the roof safely. Soil can be deceptively heavy and, if you try to carry large bags up the ladder yourself, may result in injury.
Transporting the soil in smaller, more manageable buckets may take longer to get up to the roof but will be safer in the long run.
Pour the soil onto the membrane and spread it out evenly to around a 2-3cm depth, which will give enough space for the grass roots to establish without adding additional weight from extra soil. Make sure the soil is even and is reaching all areas of the frame.
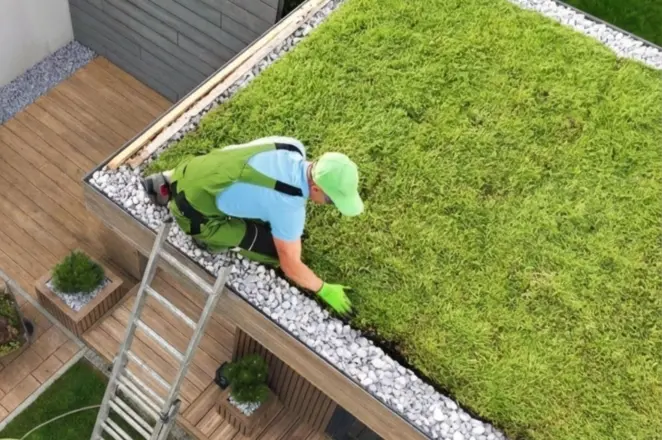
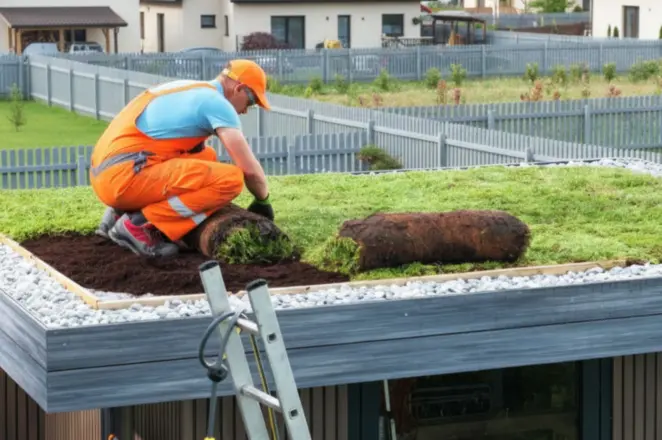
:: Laying the Turf at Height
Before laying the turf, you should make sure you’re choosing the right type for your green roof. We’d recommend our Rye Gold turf for its durability and ability to thrive in a range of growing conditions. Its fine bladed appearance will also make sure your living roof stands out.
It may need an occasional strim to keep it neat, so if you’re looking for a more low-maintenance option, you may want to opt for wildflower turf for a floral finish.
Carry the turf rolls one at a time up to the roof and lay them side by side, staggering the joints in a pattern similar to brickwork. This helps create a more natural appearance and prevents visible seam lines.
Ensure that each roll fits snugly against the next, with the edges butted tightly together to minimise gaps and promote even growth.
If your roof has an irregular or uneven shape, you may need to trim certain sections of the turf to fit neatly around the edges / corners with a sharp kitchen knife.
:: Aftercare and Maintenance
Maintaining your living roof is the final and most important step to make sure your green roof lasts for years to come.
- As living roofs are significantly exposed, the grass tends to dry out faster. So, during initial establishment, you should make sure you’re watering thoroughly.
- In the first 2-3 weeks, the turf will need watering daily to make sure the turf establishes fully and blends well.
- If its raining consistently, you may not need to water as much, as too much watering could cause the roof to become boggy.
- Over the coming weeks, the turf will naturally anchor into the soil, making it more stable, though it should be heavy enough to anchor itself until fully established – as long as there’s not heavy winds!

As the soil depth is limited on the roof, it likely won’t get as much nutrients as it would if on the ground, so, once established, you may need to fertilise regularly to make sure it’s getting the nutrients it needs to thrive.
You shouldn’t fertilise too soon after laying, as the roots need a few weeks to establish before being able to absorb nutrients.
Building a living roof is a rewarding DIY project that pays off in both aesthetics and being a thriving habitat for local wildlife. It is a surprisingly easy way to improve your home’s insulation and protect your roof.
If you want to get started on your living roof project, then our high-quality turf is the perfect choice. With next day delivery available, it’s ideal for a last-minute DIY project!
If this blog has helped you make a green roof, we’d love to see the results. Send your photos to photos@onlineturf.co.uk and you may see them featured in this blog!
